
Crispy Baked Honey Garlic Chicken Drumsticks bring together sticky honey glaze, savory garlic, and deeply browned chicken skin in a meal that feels cozy and satisfying. The drumsticks roast in the oven until the outside turns crisp while the inside stays juicy and tender. A glossy sauce coats every piece, giving each bite a balance of sweetness, saltiness, and rich roasted flavor.
This recipe works well for busy weeknights, relaxed family dinners, game-day spreads, or casual gatherings with friends. Baking the chicken instead of frying keeps preparation simple while still creating beautifully crisp skin. The sauce thickens during the final stage of cooking, creating a caramelized finish that clings to the drumsticks without becoming overly heavy.
Another reason these drumsticks work so well is their flexibility. They pair easily with rice, roasted vegetables, mashed potatoes, fresh salad, or buttery dinner rolls. The ingredients are pantry-friendly, and the cooking steps are straightforward enough for beginners while still producing restaurant-style flavor at home.
Ingredients Overview
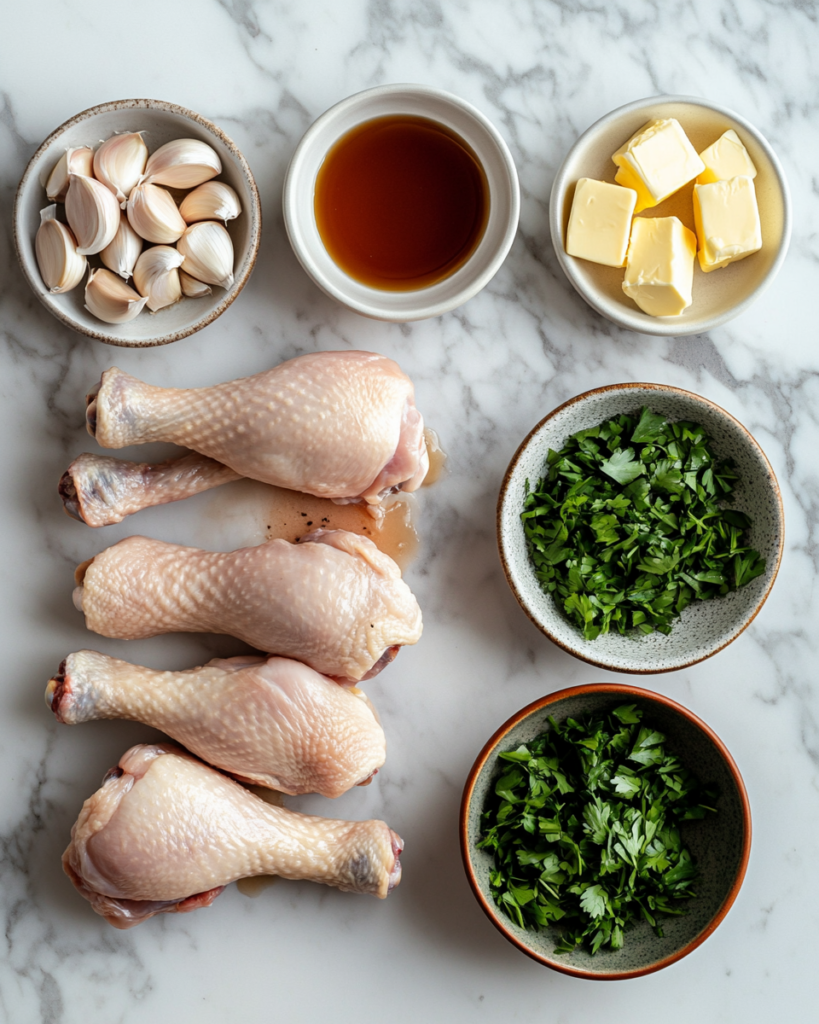
Chicken drumsticks are the centerpiece of this recipe. Their higher fat content compared to chicken breast helps them stay moist during baking. The skin also crisps nicely in the oven, especially when patted dry before seasoning. Bone-in drumsticks create richer flavor and remain tender even during longer roasting times.
Honey gives the glaze its signature sticky finish. During baking, the natural sugars caramelize and create beautiful color on the chicken. If desired, maple syrup can replace part of the honey for a slightly deeper flavor. Brown sugar also works in smaller amounts, though honey creates the smoothest glaze.
Fresh garlic adds bold savory depth. Minced garlic blends into the sauce and becomes mellow during roasting. Garlic powder can replace fresh garlic in a pinch, though fresh cloves create fuller flavor.
Soy sauce balances the sweetness with salt and umami richness. Low-sodium soy sauce works particularly well because the glaze reduces while cooking. A small amount of apple cider vinegar brightens the sauce and cuts through the richness of the chicken skin.
Paprika adds warmth and color without making the dish spicy. Smoked paprika creates a slightly smoky finish that pairs beautifully with honey and garlic. Black pepper and onion powder round out the seasoning blend.
Olive oil helps the skin crisp evenly in the oven. Cornstarch lightly coats the drumsticks and encourages extra crunch without deep frying. This small step creates a noticeable texture difference in the final dish.
Ingredients
12 chicken drumsticks
1 tablespoon olive oil
1 tablespoon cornstarch
1 teaspoon salt
1 teaspoon paprika
1 teaspoon onion powder
1/2 teaspoon black pepper
6 cloves garlic, minced
1/3 cup honey
1/4 cup low-sodium soy sauce
1 tablespoon apple cider vinegar
1 tablespoon ketchup
1 teaspoon Dijon mustard
1 tablespoon chopped parsley for garnish
Step-by-Step Instructions

Begin by preheating the oven to 425°F. High heat helps the chicken skin crisp properly while keeping the meat juicy inside. Line a large baking sheet with parchment paper or foil and place a wire rack on top if available. The rack allows hot air to circulate around the drumsticks for more even browning.
Pat the chicken drumsticks completely dry using paper towels. Moisture on the skin can prevent crisping, so this step matters. Place the drumsticks in a large bowl and drizzle with olive oil.
In a small bowl, combine the cornstarch, salt, paprika, onion powder, and black pepper. Sprinkle the seasoning mixture over the chicken and toss until evenly coated. Arrange the drumsticks on the prepared baking sheet with space between each piece.
Bake the chicken for 35 minutes, turning the drumsticks halfway through cooking. During this stage, the skin begins turning golden and crisp.
While the chicken bakes, prepare the honey garlic sauce. In a saucepan over medium heat, combine the honey, soy sauce, minced garlic, apple cider vinegar, ketchup, and Dijon mustard. Stir gently and allow the mixture to simmer for about 5 minutes until slightly thickened. The sauce should coat the back of a spoon but still pour easily.
Remove the drumsticks from the oven after the initial baking time. Brush the honey garlic sauce generously over each piece. Return the chicken to the oven for another 10 to 15 minutes. During this final stage, the glaze becomes sticky and caramelized.
Watch carefully near the end because honey can darken quickly. If the glaze begins browning too fast, loosely cover the chicken with foil for the remaining cooking time.
The chicken is finished when the internal temperature reaches 175°F near the bone. Drumsticks become especially tender at this temperature while remaining juicy.
Let the chicken rest for about 5 minutes before serving. This resting period helps the juices settle into the meat. Spoon any extra glaze from the pan over the drumsticks and sprinkle with chopped parsley before serving.
One common mistake is overcrowding the pan. Packed drumsticks release steam and soften the skin rather than crisping it. Another issue comes from applying the sauce too early. Adding the glaze during the final stage prevents burning while still creating rich caramelization.
Tips, Variations & Substitutions
For extra crispy skin, refrigerate the seasoned drumsticks uncovered for one hour before baking. This dries the surface slightly and improves browning during roasting.
Smoked paprika adds a subtle barbecue-style flavor, while cayenne pepper creates gentle heat for those who enjoy spicier chicken. A small amount of chili flakes in the glaze also pairs nicely with the sweetness of the honey.
Chicken thighs or wings can replace drumsticks using the same seasoning blend and glaze. Cooking times may vary slightly depending on size. Boneless chicken pieces also work, though bone-in cuts remain juicier during baking.
For a lighter version, remove the chicken skin before cooking. The texture will differ slightly, though the honey garlic glaze still adds plenty of flavor.
Tamari or coconut aminos can replace soy sauce for gluten-free preparation. Maple syrup may replace part of the honey for a richer sweetness. Fresh ginger also pairs beautifully with garlic and honey if a slightly Asian-inspired flavor is desired.
Leftover drumsticks store well in the refrigerator for up to four days. Reheat them in the oven rather than the microwave to maintain the crisp exterior. A quick few minutes in a hot oven brings back much of the original texture.
Serving Ideas & Occasions
Crispy Baked Honey Garlic Chicken Drumsticks fit naturally into many meal settings. They work beautifully for relaxed family dinners because they pair easily with familiar side dishes such as mashed potatoes, roasted carrots, buttered rice, or macaroni salad.
For casual gatherings or sports nights, serve the drumsticks on a large platter with celery sticks, pickles, and dipping sauces. Their sticky glaze and handheld size make them especially popular for buffet-style meals.
A fresh cucumber salad or crunchy coleslaw balances the richness of the chicken nicely. Cornbread, roasted sweet potatoes, or garlic noodles also complement the sweet and savory glaze.
Cold sparkling water with lemon, iced tea, or ginger ale pair well with the bold garlic flavor. During cooler months, these drumsticks feel especially comforting alongside warm baked vegetables or creamy potato dishes.
The recipe also works well for meal preparation since the drumsticks reheat successfully for lunches throughout the week.
Nutritional & Health Notes
Chicken drumsticks provide protein, iron, zinc, and several important B vitamins. Because dark meat contains slightly more fat than chicken breast, the texture stays moist and flavorful during baking.
Baking instead of deep frying reduces the amount of added oil while still producing crisp skin. Using a wire rack also allows excess fat to drip away from the chicken during cooking.
Honey contributes sweetness and helps create the caramelized glaze. Since the sauce contains natural sugars, moderation in portion size helps keep the meal balanced. Pairing the drumsticks with vegetables or fresh salads creates a more complete plate.
Low-sodium soy sauce lowers the salt level while still adding savory depth. Garlic contributes strong flavor without needing large amounts of butter or heavy cream.
For lighter serving ideas, pair the chicken with steamed vegetables, cauliflower rice, or fresh greens. Removing the skin before eating also lowers the overall fat content while still allowing the meat to remain juicy from the glaze.
FAQs
Can I prepare the chicken drumsticks ahead of time?
Yes, these drumsticks work very well for advance preparation. You can season the chicken up to one day before baking and store it covered in the refrigerator. This resting period also helps the seasoning absorb into the meat more deeply. The honey garlic sauce can also be prepared ahead and refrigerated separately for up to three days. When ready to cook, simply bake the drumsticks as directed and brush on the warmed glaze during the final cooking stage. If the sauce thickens in the refrigerator, stir in a teaspoon of water while reheating. Preparing parts of the recipe early makes dinner much easier during busy evenings while still producing fresh flavor and crispy texture.
Why are my chicken drumsticks not getting crispy?
The most common reason is excess moisture on the chicken skin. Patting the drumsticks dry before seasoning is very important because moisture creates steam in the oven. Overcrowding the baking sheet can also prevent crisping since the chicken pieces trap heat and steam around each other. Using high oven temperature helps develop crisp texture as well. Another helpful step is placing the chicken on a wire rack instead of directly on the baking sheet. Air circulates around the drumsticks more evenly, helping all sides brown properly. Finally, adding the honey glaze too early may soften the skin before it has fully crisped in the oven.
Can I use chicken wings instead of drumsticks?
Yes, chicken wings work beautifully with this honey garlic glaze. Since wings are smaller, they cook more quickly than drumsticks. Bake them at the same temperature but begin checking for doneness around 30 minutes. Wings become especially crispy because they have more skin relative to meat. You can also separate flats and drumettes before cooking for easier serving. The sauce amount in this recipe should still cover about two pounds of wings comfortably. Toss the wings carefully in the glaze during the final stage of cooking so the coating sticks evenly without becoming too thick or heavy.
How should I store leftovers?
Allow the drumsticks to cool fully before placing them in an airtight container. Store them in the refrigerator for up to four days. To maintain the best texture, reheat them in a 375°F oven for about 10 to 15 minutes rather than microwaving. Oven reheating helps restore some crispness to the skin while warming the glaze evenly. If desired, brush on a little extra sauce before reheating for added moisture. These drumsticks can also be frozen for up to two months. Thaw overnight in the refrigerator before reheating. The flavor remains rich and savory even after storage.
Can I make the sauce less sweet?
Certainly. Reducing the honey slightly creates a more savory glaze while still keeping the sticky texture that makes the recipe appealing. Adding an extra splash of soy sauce or vinegar also balances sweetness nicely. Some cooks prefer adding fresh ginger, chili flakes, or a little mustard for sharper flavor contrast. If using very sweet honey, balancing ingredients become especially helpful. Taste the sauce before brushing it onto the chicken and adjust according to preference. The garlic and soy sauce naturally create enough savory depth that the recipe still tastes full and satisfying even with reduced sweetness.
What side dishes pair well with these drumsticks?
These drumsticks pair well with many comforting side dishes. Roasted potatoes, steamed rice, and buttery noodles all absorb the flavorful honey garlic glaze nicely. Fresh vegetables such as green beans, broccoli, or roasted carrots balance the richness of the chicken. Coleslaw adds crunch and brightness, especially for summer meals or gatherings. For lighter meals, serve the drumsticks alongside cucumber salad or mixed greens with vinaigrette dressing. Bread rolls or cornbread also pair naturally with the sticky glaze. Since the chicken contains sweet and savory notes, both fresh and hearty sides work successfully depending on the occasion.
Can I cook these drumsticks in an air fryer?
Yes, air fryers work very well for this recipe because they circulate heat rapidly around the chicken skin. Cook the seasoned drumsticks at 400°F for about 20 to 25 minutes, turning halfway through cooking. Once the chicken becomes crisp and nearly finished, brush on the honey garlic glaze and cook for another few minutes until sticky and caramelized. Watch carefully near the end because the honey can brown quickly in the concentrated heat of an air fryer. Depending on the size of the basket, you may need to cook the drumsticks in batches so the air circulates properly around each piece.


